Unit 8: Production for Dau abare Part 1
 from each of these examples i picked up on little tips and tricks to help me with my game, for example in one of them i learned of a starter pack that everyone can get for free provided by unreal engine, getting this helped me save a lot of time making animations on other programs.
HUD
now at the beginning my game looked very different from what it looks like now, for example i had a HUD (which i plan on implementing again on a later date) which was fine for the time being and it allowed me to include a feature where if the player right clicks it zooms in and starts showing a cross hair much like call of duty games.
making the HUD
it was very simple to make the HUD i just had to click on progress bar and and add the heath text to it, this would allow me to make the health go down if for example my character was shot.
blueprints for HUD
to actually add in the HUD into the game i had to use this simple blueprint, which i did by creating an event begin play and adding a HUD widget to it as seen in the image below.
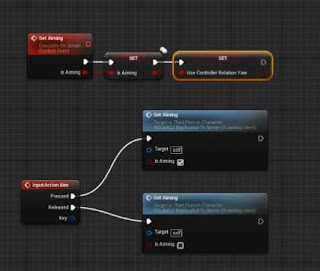
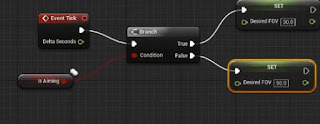
now to add the zoom in feature it was a bit more difficult, i first had to create a simple cross hair using Photoshop, add it to my HUD then add the needed blue print to the graph part of my HUD. the three images before are the blue prints i used for my character aiming.
changing my game to current version
in the video above is the current version of my game as you can see its a bit different from the original version of my game.
changing animations
the first thing i did or attempted to do was change the animations for my character to allow him to transition between idle, walking and running, this was one of my major road blocks which i did not anticipate, because as much as i tried i could not get the blend space animation sequence to work and after trying a large amount of different videos that could help with the situation i was in i found one
that somewhat explained what to do in order to make this process work.
video:
blue print of walking animation
now to get the blueprint for the idle, walk and run animation i had to combine a few blue prints to make it work, firstly i created the blend animation for my idle, walk and run character. as seen from the image below:
then i started making the blueprint to make the character move accordingly and this is how it looked when i finished everything.
adding pick up and drop
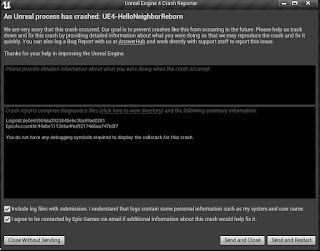
now for the final thing i did to get the version i currently have was to add in the pick up and drop feature, now getting this feature to work was by far the hardest thing I've done so far the first thing i noticed was the amount of game crashing errors i was getting because of the mix of blueprints for example this one below:
Having this happen to me deterred me from even continuing making this game but i continued on and finally found a solution using a combination of: https://answers.unrealengine.com/questions/727458/pickup-item-with-e-key.html, to find the first part of the blue print and the video below to get the second half of the blueprint:
in the end i finally got the correct blueprint as seen in these images below and finally got the second part of my game completed.
this first image bellow is what the final blue print of picking up and dropping items looked like:
this second image bellow shows how i had to created an empty inventory space so it can seamlessly transition between picking up and dropping items.
this third image bellow shows how i had to make the character mesh into a parent mesh for my first weapon.


Comments
Post a Comment